FluentdからElasticsearchに転送してKibanaで可視化する
こんにちは@oko_changです。
前回はFluentdについて記載しましたが、今回はFluentdからElasticsearchにログを転送してKibanaで可視化するまでをまとめておきたいと思います。
環境概要
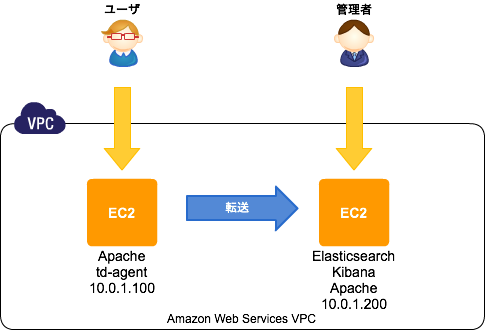
前回の環境にElasticsearchとKibanaを追加するイメージです。
- CentOS6.5
Elasticsearchのセットアップ
インストールは公式にあるようにYumのリポジトリを追加して簡単に出来ます。
javaが必要なので、それもインストールしておきます。
# rpm --import http://packages.elasticsearch.org/GPG-KEY-elasticsearch
# cat >> /etc/yum.repos.d/elasticsearch.repo <<'EOF'
[elasticsearch-1.0]
name=Elasticsearch repository for 1.0.x packages
baseurl=http://packages.elasticsearch.org/elasticsearch/1.0/centos
gpgcheck=1
gpgkey=http://packages.elasticsearch.org/GPG-KEY-elasticsearch
enabled=1
EOF
# yum install elasticsearch java-1.7.0-openjdk
インストールが終わったら起動して、動作確認してみます。
# chkconfig elasticsearch on
# service elasticsearch start
# curl -X GET http://localhost:9200/
{
  "status" : 200,
  "name" : "Knickknack",
  "version" : {
    "number" : "1.0.1",
    "build_hash" : "5c03844e1978e5cc924dab2a423dc63ce881c42b",
    "build_timestamp" : "2014-02-25T15:52:53Z",
    "build_snapshot" : false,
    "lucene_version" : "4.6"
  },
  "tagline" : "You Know, for Search"
}
Kibanaのセットアップ
Kibanaもセットアップは簡単です。
公式ページから圧縮ファイルをダウンロードして、任意のディレクトリに配置します。
KibanaはJavascriptで動作しており、アクセスされるブラウザからElasticsearchがListenしているポートに接続出来る必要があります。
ちょっとその構成が気持ち悪いので、今回はconfig.js内のelasticsearch:の設定を以下のようにし、Apacheのリバースプロキシ経由でアクセスするようにしたいと思います。
※Apacheの設定は後述。
# useradd kibana
# passwd kibana
# chmod +x /home/kibana
# su - kibana
$ curl -LO https://download.elasticsearch.org/kibana/kibana/kibana-3.0.0milestone5.tar.gz
$ tar zxvf kibana-3.0.0milestone5.tar.gz
$ ln -s /home/kibana/kibana-3.0.0milestone5 ./kibana
$ vi /home/kibana/kibana/config.js
$ grep okochang /home/kibana/kibana/config.js
    elasticsearch: "http://kibana.okochang.com/es/",
# exit
Apache
Apacheは、以下のように名前ベースのVirtualHostを設定しています。
さらにElasticsearchへの接続用に/es/をリバースプロキシ構成にしています。
必要に応じてDigest認証の設定も追加します。
# yum install httpd
# htdigest -c /etc/httpd/conf/htdigest "Required authentication" okochang
# vi /etc/httpd/conf.d/vhosts.conf
# cat /etc/httpd/conf.d/vhosts.conf
NameVirtualHost *:80
<VirtualHost *:80>
    DocumentRoot /home/kibana/kibana
    ServerName kibana.okochang.com
    ProxyPass /es/ http://localhost:9200/
    ProxyPassReverse /es/ http://localhost:9200/
    CustomLog logs/access_log custom
    ErrorLog logs/error_log
    Options FollowSymLinks
    <Location />
        AuthType Digest
        AuthName "Required authentication"
        AuthUserFile /etc/httpd/conf/htdigest
        require valid-user
        Satisfy any
        Order deny,allow
        Deny from all
        Allow from 127.0.0.1
    </Location>
</VirtualHost>
# httpd -t
# chkconfig httpd on
# service httpd start
ブラウザからKibanaにアクセス
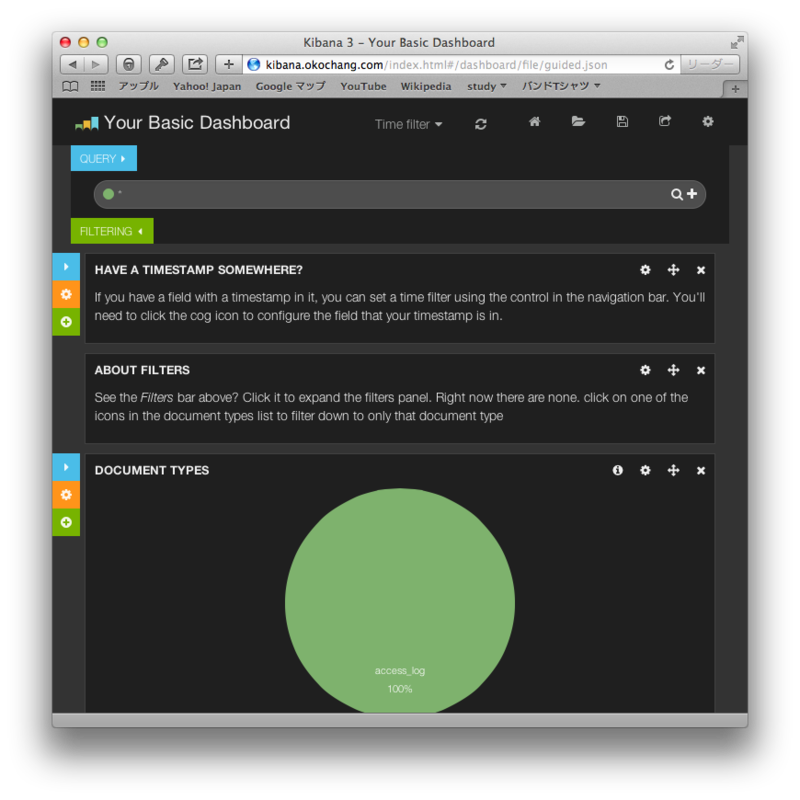
以下のように管理画面のトップページが表示されます。

fluent-plugin-elasticsearch
最後に転送元のサーバでfluent-plugin-elasticsearchをインストールして、Elasticsearchに転送する設定をします。
※以下は前回設定行った設定に追記しております。
# sudo yum install gcc gcc-c++ libcurl-devel
# /usr/lib64/fluent/ruby/bin/fluent-gem install fluent-plugin-elasticsearch --no-ri --no-rdoc
# vi /etc/td-agent/td-agent.conf
# cat /etc/td-agent/td-agent.conf
## Input
<source>
  type tail
  path /var/log/httpd/access_log
  format /^(?<date>\d{4}-\d{2}-\d{2} \d{2}:\d{2}:\d{2} \w{3}) (?<processing_time>[^ ]*) (?<remote>[^ ]*) (?<user>[^ ]*) \[(?<method>.*)\] (?<status>[^ ]*) (?<size>[^ ]*) \[(?<referer>[^ ]*)\] \[(?<agent>.*)\]/
  pos_file /var/log/td-agent/tmp/apache.access.log.pos
  tag apache.access
</source>

## Output
<match apache.access>
  type copy
  <store>
    type file
    path /var/log/td-agent/apache.access
    time_slice_format %Y%m%d
    time_format %Y%m%dT%H%M%S%z
  </store>
  <store>
    type forward
    send_timeout 60s
    recover_wait 10s
    heartbeat_interval 1s
    <server>
      name fluentd.okochang.com
      host 10.0.1.200
      port 24224
    </server>
  </store>
  <store>
    type elasticsearch
    host 10.0.1.200
    port 9200
    type_name access_log
    logstash_format true
    logstash_prefix apache_access
    logstash_dateformat %Y%m
    flush_interval 10s
  </store>
</match>
追記(2014年3月22日)
Elasticsearchのsは小文字が正解です。
Sは小文字!
— Jun Ohtani (@johtani) 2014, 3月 22ご指摘ありがとうございます、修正しました!
感想
セットアップは思ったよりも簡単ですね。
管理が画面もカッコイイし、色々なログをElasticsearchに保存して可視化したくなります。
参考リンク
- http://www.elasticsearch.org/
- http://www.elasticsearch.org/overview/kibana/
- http://www.elasticsearch.org/blog/apt-and-yum-repositories/
- http://www.elasticsearch.org/overview/kibana/installation/
- http://docs.fluentd.org/ja/articles/free-alternative-to-splunk-by-fluentd
- http://blog.excale.net/index.php/archives/1929
- http://qiita.com/kakipo/items/5ccaab8581a3158dfcff
- http://blog.manabusakai.com/2014/02/centos-elasticsearch-install/
- http://kame-t.hatenablog.jp/entry/2014/02/28/160523
FluetndでApacheのアクセスログを集約する
こんにちは@oko_changです。
すでに色々な方がまとめていますが、やっぱり自分なりにブログにまとめたほうが覚えやすいので今回はfluentdについて書きます。
Fluentdとは?
こちらを見るのがやはり早いですかね。
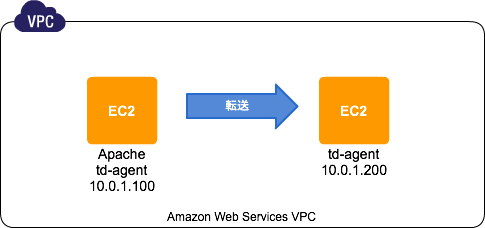
環境
どちらもCentOS 6.5を使用しています。
今回はFluentdを使ってローカルのファイルに保存しつつ、転送先にも保存するまで確認します。
転送元環境
インストール前
Fluentdについては色々な方がブログとかでもまとめているので、そちらを参考になりますが、公式ドキュメントもとても充実していました。
ここにFluentdをインストール前にするべき事が記載されていますので、設定します。
※limits.confとsysctl.confにそれぞれ追記する
# vi /etc/security/limits.conf
root soft nofile 65536
root hard nofile 65536
* soft nofile 65536
* hard nofile 65536

# vi /etc/sysctl.conf
net.ipv4.tcp_tw_recycle = 1
net.ipv4.tcp_tw_reuse = 1
net.ipv4.ip_local_port_range = 10240    65535

# reboot
Apacheの設定
今回はテスト用のログファイルとしてApacheのアクセスログを使用します。
テスト環境のアクセスログのフォーマットは以下のように変更してあります。
また、td-agent(Fluentd安定版の配布パッケージ )にアクセス出来るようにログディレクトリの権限を修正します。
# grep "custom" /etc/httpd/conf/httpd.conf
LogFormat "%{%Y-%m-%d %T %Z}t %D %a %u [%r] %s %b [%{Referer}i] [%{User-Agent}i]" custom
CustomLog logs/access_log custom
# chmod 755 /var/log/httpd
td-agentのインストール、設定
次にtd-agentをインストールします。
公式ドキュメントに記載してあるようにインストールスクリプトを使って簡単に導入が可能です。
# curl -L http://toolbelt.treasuredata.com/sh/install-redhat.sh | sh
設定方法も公式ドキュメントのconfig-file、input-plugin、output-pluginをひと通り読むと分かりやすかったです。
Apacheデフォルトのログ形式であればテンプレートがあるみたいですが、今回は少しカスタマイズしているため、正規表現のチェックをこちらでやりました。
また、自分のローカルと別のFluetndサーバに転送するため、以下のような設定をしています。
# vi /etc/td-agent/td-agent.conf
## Input
<source>
  type tail
  path /var/log/httpd/access_log
  format /^(?<date>\d{4}-\d{2}-\d{2} \d{2}:\d{2}:\d{2} \w{3}) (?<processing_time>[^ ]*) (?<remote>[^ ]*) (?<user>[^ ]*) \[(?<method>.*)\] (?<status>[^ ]*) (?<size>[^ ]*) \[(?<referer>[^ ]*)\] \[(?<agent>.*)\]/
  pos_file /var/log/td-agent/tmp/apache.access.log.pos
  tag apache.access
</source>

## Output
<match apache.access>
  type copy
  <store>
    type file
    path /var/log/td-agent/apache.access
    time_slice_format %Y%m%d
    time_format %Y%m%dT%H%M%S%z
  </store>
  <store>
    type forward
    send_timeout 60s
    recover_wait 10s
    heartbeat_interval 1s
    <server>
      name fluentd.okochang.com
      host 10.0.1.200
      port 24224
    </server>
  </store>
</match>上記で設定したディレクトリなどを作成して、自動起動の設定をしたらデーモンを起動します。
# mkdir /var/log/td-agent/tmp
# chown td-agent.td-agent /var/log/td-agent/tmp
# chkconfig td-agent on
# service td-agent start
転送先環境
転送元環境と同じようにインストール前の作業をしたら、td-agentを同じくインストールします。
td-agent.confは以下のように設定しました。
# curl -L http://toolbelt.treasuredata.com/sh/install-redhat.sh | sh
# vi /etc/td-agent/td-agent.conf
<source>
  type forward
  port 24224
  bind 0.0.0.0
</source>

<match apache.access>
  type file
  path /var/log/fluentd/all_access.log
  time_slice_format %Y%m%d
  time_format %Y%m%dT%H%M%S%z
</match>
さらに必要なディレクトリを作成し、自動起動の設定をしたら起動します。
# mkdir /var/log/fluentd
# chown td-agent.td-agent /var/log/fluentd/
# chkconfig td-agent on
# service td-agent start
動作確認
以下のようにログが出力されました。
転送元のログファイル
# tail -f /var/log/td-agent/apache.access.20140317.b4f4bb855c8fbaa5a
20140317T094432+0900	apache.access	{"date":"2014-03-17 09:44:32 JST","processing_time":"372","remote":"202.215.74.59","user":"-","method":"GET / HTTP/1.1","status":"304","size":"-","referer":"-","agent":"Mozilla/5.0 (Macintosh; Intel Mac OS X 10.7; rv:27.0) Gecko/20100101 Firefox/27.0"}
転送先のログファイル
# tail -f /var/log/fluentd/all_access.log.20140317.b4f4bb675d4776d09
20140317T094432+0900	apache.access	{"date":"2014-03-17 09:44:32 JST","processing_time":"372","remote":"202.215.74.59","user":"-","method":"GET / HTTP/1.1","status":"304","size":"-","referer":"-","agent":"Mozilla/5.0 (Macintosh; Intel Mac OS X 10.7; rv:27.0) Gecko/20100101 Firefox/27.0"}
まとめ
fluetndは色々な方がブログにそれちらも参考になるけど、やっぱり公式のドキュメント読むとさらに理解が深まりますね。
参考リンク
- http://docs.fluentd.org/ja/articles/before-install
- http://docs.fluentd.org/ja/articles/install-by-rpm
- http://docs.fluentd.org/ja/articles/config-file
- http://docs.fluentd.org/ja/articles/input-plugin-overview
- http://docs.fluentd.org/ja/articles/output-plugin-overview
- http://fluentular.herokuapp.com/
- http://hivecolor.com/id/37
- http://knowledge.sakura.ad.jp/tech/1336/
- http://blog.excale.net/index.php/archives/1704
- http://blog.excale.net/index.php/archives/1997
mod_evasiveはEPELからインストール出来るみたい
こんにちは@oko_changです。
mod_evasiveはDos/DDos/brute forceアタックに有効なApacheモジュールですが、EPELから簡単にインストール出来るようなので備忘録としてまとめておきます。
導入手順
EPELリポジトリの追加
# rpm http://ftp.riken.jp/Linux/fedora/epel/6/x86_64/epel-release-6-8.noarch.rpm
mod_evasiveのインストール
# yum --enablerepo=epel install mod_evasive
ロックファイルを配置するディレクトリを作成します。
# mkdir /var/lock/mod_evasive
# chown apache.apache /var/lock/mod_evasive
少し変えてるけど設定ファイルはデフォルトだとだいたいこんな感じです。
# cat /etc/httpd/conf.d/mod_evasive.conf
LoadModule evasive20_module modules/mod_evasive20.so

<IfModule mod_evasive20.c>
    DOSHashTableSize    3097
    DOSPageCount        2
    DOSSiteCount        50
    DOSPageInterval     1
    DOSSiteInterval     1
    DOSBlockingPeriod   10
    DOSLogDir           "/var/lock/mod_evasive"
    #DOSWhitelist   127.0.0.1
</IfModule>Apacheを再起動して有効化
# service httpd restart
テスト
テスト用のスクリプトで動作確認ができます。
# perl /usr/share/doc/mod_evasive-1.10.1/test.pl
HTTP/1.1 200 OK
HTTP/1.1 200 OK
HTTP/1.1 200 OK
HTTP/1.1 200 OK
HTTP/1.1 200 OK
HTTP/1.1 200 OK
HTTP/1.1 200 OK
HTTP/1.1 200 OK
HTTP/1.1 200 OK
HTTP/1.1 200 OK
HTTP/1.1 200 OK
HTTP/1.1 200 OK
HTTP/1.1 200 OK
HTTP/1.1 200 OK
HTTP/1.1 200 OK
HTTP/1.1 200 OK
HTTP/1.1 200 OK
HTTP/1.1 200 OK
HTTP/1.1 200 OK
HTTP/1.1 200 OK
HTTP/1.1 200 OK
HTTP/1.1 200 OK
HTTP/1.1 200 OK
HTTP/1.1 200 OK
HTTP/1.1 403 Forbidden
HTTP/1.1 403 Forbidden
HTTP/1.1 403 Forbidden
HTTP/1.1 403 Forbidden
HTTP/1.1 403 Forbidden
HTTP/1.1 403 Forbidden
HTTP/1.1 403 Forbidden
HTTP/1.1 403 Forbidden
HTTP/1.1 403 Forbidden
HTTP/1.1 403 Forbidden
HTTP/1.1 403 Forbidden
HTTP/1.1 403 Forbidden
HTTP/1.1 403 Forbidden
HTTP/1.1 403 Forbidden
HTTP/1.1 403 Forbidden
HTTP/1.1 403 Forbidden
HTTP/1.1 403 Forbidden
HTTP/1.1 403 Forbidden
HTTP/1.1 403 Forbidden
HTTP/1.1 403 Forbidden
HTTP/1.1 403 Forbidden
HTTP/1.1 403 Forbidden
HTTP/1.1 403 Forbidden
HTTP/1.1 403 Forbidden
HTTP/1.1 403 Forbidden
HTTP/1.1 403 Forbidden
HTTP/1.1 403 Forbidden
HTTP/1.1 403 Forbidden
HTTP/1.1 403 Forbidden
HTTP/1.1 403 Forbidden
HTTP/1.1 403 Forbidden
HTTP/1.1 403 Forbidden
HTTP/1.1 403 Forbidden
HTTP/1.1 403 Forbidden
HTTP/1.1 403 Forbidden
HTTP/1.1 403 Forbidden
HTTP/1.1 403 Forbidden
HTTP/1.1 403 Forbidden
HTTP/1.1 403 Forbidden
HTTP/1.1 403 Forbidden
HTTP/1.1 403 Forbidden
HTTP/1.1 403 Forbidden
HTTP/1.1 403 Forbidden
HTTP/1.1 403 Forbidden
HTTP/1.1 403 Forbidden
HTTP/1.1 403 Forbidden
HTTP/1.1 403 Forbidden
HTTP/1.1 403 Forbidden
HTTP/1.1 403 Forbidden
HTTP/1.1 403 Forbidden
HTTP/1.1 403 Forbidden
HTTP/1.1 403 Forbidden
HTTP/1.1 403 Forbidden
HTTP/1.1 403 Forbidden
HTTP/1.1 403 Forbidden
HTTP/1.1 403 Forbidden
HTTP/1.1 403 Forbidden
HTTP/1.1 403 Forbidden
HTTP/1.1 403 Forbidden
HTTP/1.1 403 Forbidden
HTTP/1.1 403 Forbidden
HTTP/1.1 403 Forbidden
HTTP/1.1 403 Forbidden
HTTP/1.1 403 Forbidden
HTTP/1.1 403 Forbidden
HTTP/1.1 403 Forbidden
HTTP/1.1 403 Forbidden
HTTP/1.1 403 Forbidden
HTTP/1.1 403 Forbidden
HTTP/1.1 403 Forbidden
HTTP/1.1 403 Forbidden
HTTP/1.1 403 Forbidden
HTTP/1.1 403 Forbidden
HTTP/1.1 403 Forbidden
HTTP/1.1 403 Forbidden
HTTP/1.1 403 Forbidden
HTTP/1.1 403 Forbidden
感想
ソースインストールでも簡単だけど、EPELからインストール出来るとさらに簡単なので良い。
Vagrant、Chef Soloでの環境構築からserverspecでのテストまでをJenkinsでビルド
こんにちは@oko_changです。
今回の内容は前回の続きになっており、Packer、Vagrant、Chef Soloでの環境構築からserverspecまでのテストをJenkinsでビルドをしてみたいと思います。
環境準備
OSXにJenkinsをインストールする。
$ brew install jenkins
Jenkinsの設定ファイルをカスタマイズする(
$ vi /usr/local/opt/jenkins/homebrew.mxcl.jenkins.plist
Jenkinsをlaunchctlで自動起動するため、以下のように実行する。
$ ln -sfv /usr/local/opt/jenkins/*.plist ~/Library/LaunchAgents
$ launchctl load ~/Library/LaunchAgents/homebrew.mxcl.jenkins.plist
localhostに接続すると無事にJenkinsにアクセスが出来る。
Jenkinsの設定
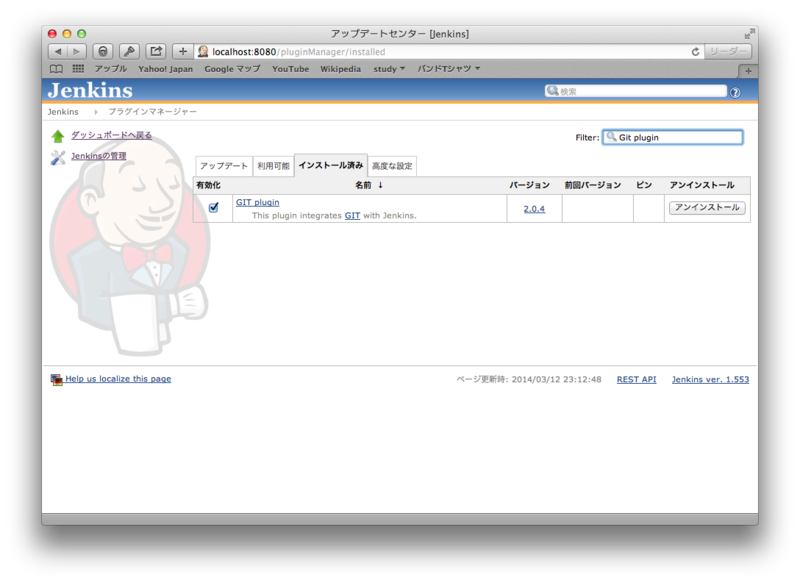
Jenkinsのプラグイン管理画面からGit Pluginをインストールする(インストール後再起動)。
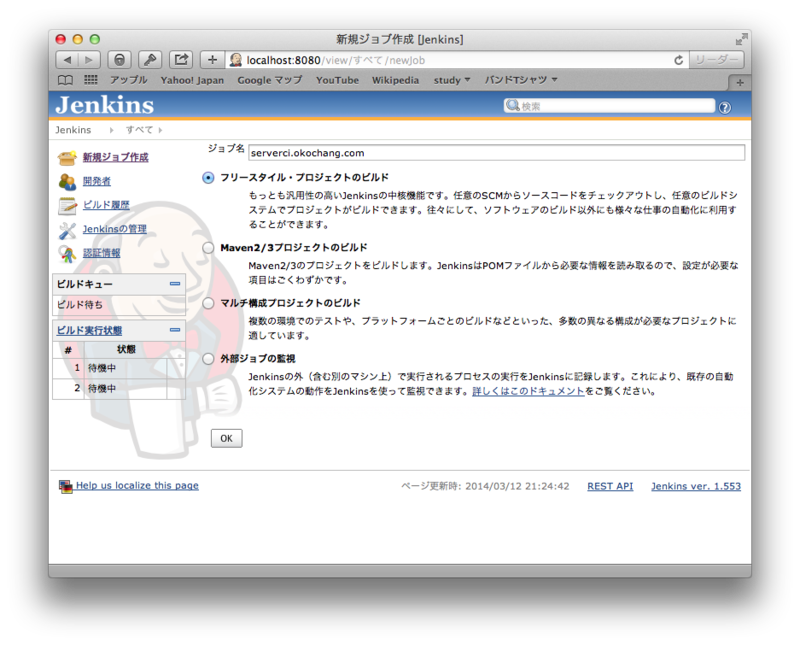
新規ジョブ作成からジョブ名を指定してフリースタイル・プロジェクトのビルドにチェックしてOKをクリック。
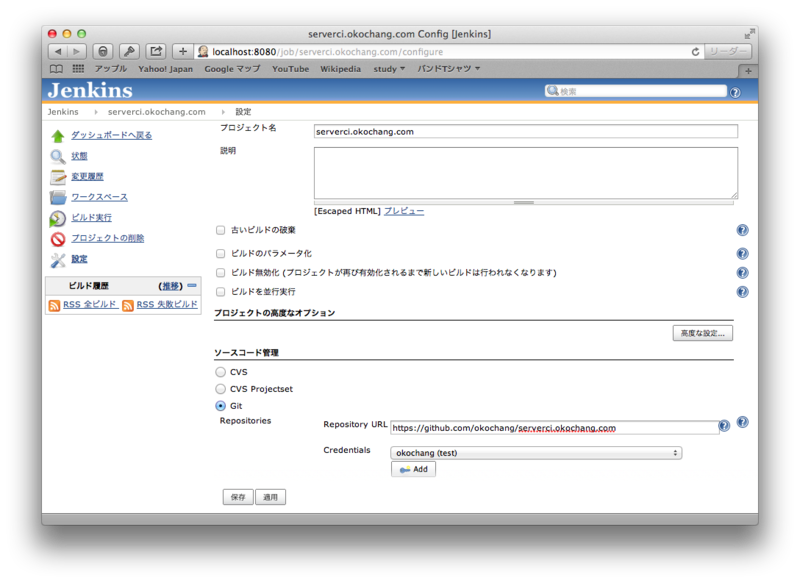
リポジトリにてGitを選択し、SSHの設定、ビルド時に実行するシェルスクリプトを書いておきます。
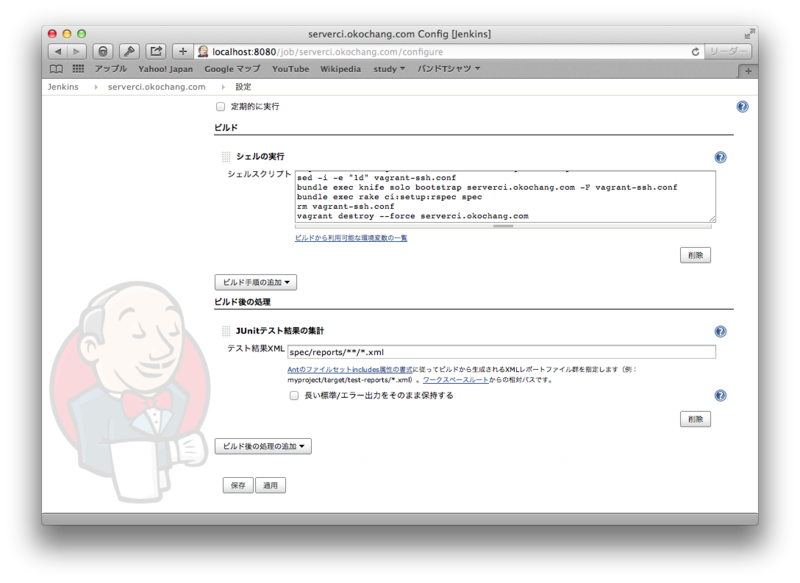
今回書いたシェルスクリプトは以下のとおりです。
#!/bin/bash
source ~/.bash_profile
rvm use 2.1.0
vagrant up --provider aws
vagrant ssh-config --host=serverci.okochang.com > vagrant-ssh.conf
sed -i -e "1d" vagrant-ssh.conf
bundle exec knife solo bootstrap serverci.okochang.com -F vagrant-ssh.conf
bundle exec rake ci:setup:rspec spec
rm vagrant-ssh.conf
vagrant destroy --force serverci.okochang.com
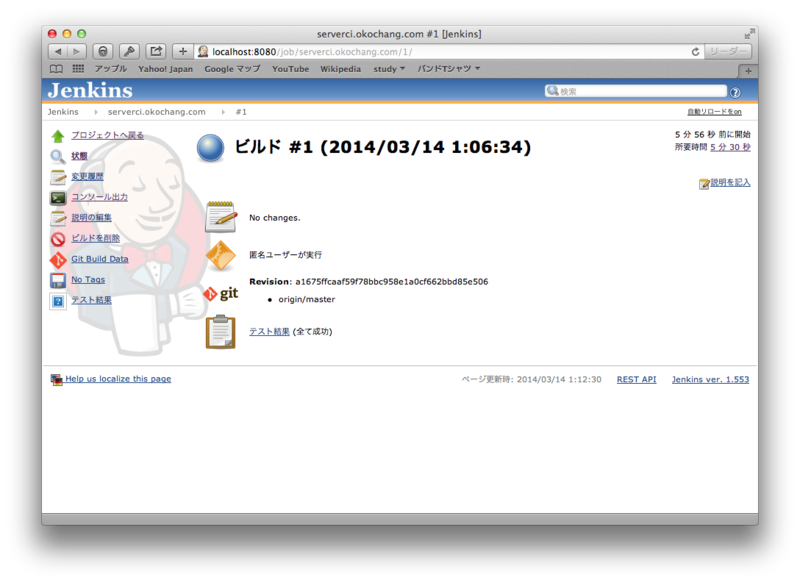
ジョブが登録されたらビルドを実行して、成功したら動作確認完了。
感想
自分できちっとまとめたので、少し理解が深まったかな。
参考リンク
http://d.hatena.ne.jp/naoya/20130520/1369054828
http://d.hatena.ne.jp/idesaku/20110730/1311997411
http://qiita.com/makoto_kw/items/cbe93d4ebbc35f3b43fd
http://qiita.com/skinoshita/items/6862b4a6726fc3b24944
http://dev.classmethod.jp/smartphone/iphone/jenkins-cocoapods/
http://megadreams14.com/?p=27
http://qiita.com/h7kayama/items/318618c1863e866457cb
https://groups.google.com/forum/#!topic/vagrant-up/ExFet5jMomU
Packer、Vagrant、Chef Soloで構築した環境をserverspecでテストする
こんにちは、@oko_changです。
伊藤直也さんのブログにあるこちらの記事は読んでいたのですが、自分でもう少し整理したかったので今回はその内容を残しておきます。
構成
OSXに以下のツールをインストールしてありま、レシピの適用とテスト先のサーバがAWS上のEC2インスタンスといって感じです。
- Packer
- Vagrant
- Chef SoloやJenkins
また、今回の内容はこちらのリポジトリにまとめておきました。
環境構築
実作業
リポジトリの初期化
リポジトリ初期化ついでにknifeコマンドでChefリポジトリのテンプレートを作成します。
$ knife solo init serverci.okochang.com
$ cd serverci.okochang.com
$ touch README.md
bundle
今回の作業で必要となるソフトウェアを管理するためにGemfileを作成します。
最終的にjenkinsでテストするのでci_reporterが必要。
$ bundle init
$ vi Gemfile
$ bundle install --path vendor/bundle
Packer
まずは最初にPackerを使って基本となるAMIを作成しておきます。
ここで使ったjsonファイルもリポジトリにあげています。
$ vi packer.json
$ packer build packer.json
==> Builds finished. The artifacts of successful builds are:
--> amazon-ebs: AMIs were created:

ap-northeast-1: ami-b5c0b1b4
Vagrant
次に先ほど作成されたAMIから起動するVagrantfileを作成&更新をします。
Packerのjsonファイルと同様にVagrantfileもリポジトリにアップしています。
$ vagrant init centos
$ vi Vagrantfile
serverspec
次にserverspecのテストを作りますので、初期化します。
$ bundle exec serverspec-init
Select OS type:

  1) UN*X
  2) Windows

Select number: 1

Select a backend type:

  1) SSH
  2) Exec (local)

Select number: 1

Vagrant instance y/n: y
Auto-configure Vagrant from Vagrantfile? y/n: n
Input vagrant instance name: serverci.okochang.com
 + spec/
 + spec/serverci.okochang.com/
 + spec/serverci.okochang.com/httpd_spec.rb
 + spec/spec_helper.rb
 + Rakefile
最終的にci_reporterで出力を出すための設定を追記しておきます。
$ vi Rakefile
テストコードも忘れずにアップデートします。
$ vi spec/default/httpd_spec.rb
chef
次に今回のサーバ構築に使用するChefのレシピを作成します。
$ bundle exec knife cookbook create httpd -o site-cookbooks
$ vi site-cookbooks/httpd/recipes/default.rb
$ vi site-cookbooks/httpd/templates/default/httpd.conf.erb
$ vi nodes/serverci.okochang.com.json
テスト実行
あとは以下のようにvagrant upしてプロビジョニングとテストを実行します。
テストが終わったら忘れずに環境を削除しておきます。
※[fog][WARNING] Unable to load the 'unf' gem.のエラー、unfを入れても解決出来てなくて強引にsedで回避しているのなんとかしなきゃ。
$ vagrant up --provider aws
$ vagrant ssh-config --host=serverci.okochang.com > vagrant-ssh.conf
$ sed -i -e "1d" vagrant-ssh.conf
$ bundle exec knife solo bootstrap serverci.okochang.com -F vagrant-ssh.conf
$ bundle exec rake spec
$ rm vagrant-ssh.conf
$ vagrant destroy serverci.okochang.com
残りの作業
Jenkinsでテストを自動化するところのまとめ
awscliでVPCのDHCP Options Setの設定をする
VPCにはDHCP Options Setという機能があり、DHCPで設定される設定をカスタマイズ出来ます。
今回はawscliでの設定方法と、カスタマイズされた設定の確認をしたいと思います。
環境構築
VPCの作成
$ aws ec2 create-vpc --cidr-block 10.0.0.0/16 --instance-tenancy default --region ap-northeast-1
{
    "Vpc": {
        "InstanceTenancy": "default",
        "State": "pending",
        "VpcId": "vpc-aa4958c8",
        "CidrBlock": "10.0.0.0/16",
        "DhcpOptionsId": "dopt-03c5a56a"
    }
}VPCのDNS SupportとDNS Hostnamesを有効にします。
$ aws ec2 modify-vpc-attribute --vpc-id vpc-aa4958c8 --enable-dns-support "{\"Value\":true}" --region ap-northeast-1
{
    "return": "true"
}
$ aws ec2 modify-vpc-attribute --vpc-id vpc-aa4958c8 --enable-dns-hostnames "{\"Value\":true}" --region ap-northeast-1
{
    "return": "true"
}
VPC Subnetを作成します。
$ aws ec2 create-subnet --cidr-block 10.0.0.0/24 --vpc-id vpc-aa4958c8 --availability-zone ap-northeast-1a --region ap-northeast-1
{
    "Subnet": {
        "VpcId": "vpc-aa4958c8",
        "CidrBlock": "10.0.0.0/24",
        "State": "pending",
        "AvailabilityZone": "ap-northeast-1a",
        "SubnetId": "subnet-e71f1685",
        "AvailableIpAddressCount": 251
    }
}カスタマイズしたDHCP Options Setを作成し、VPCに割り当てます
$ aws ec2 create-dhcp-options --dhcp-configuration \
"Key=domain-name,Values=okochang.com" \
"Key=domain-name-servers,Values=8.8.8.8,8.8.4.4" \
"Key=ntp-servers,Values=210.173.160.27" \
--region ap-northeast-1
{
    "DhcpOptions": {
        "DhcpConfigurations": [
            {
                "Values": [
                    "210.173.160.27"
                ],
                "Key": "ntp-servers"
            },
            {
                "Values": [
                    "okochang.com"
                ],
                "Key": "domain-name"
            },
            {
                "Values": [
                    "8.8.4.4",
                    "8.8.8.8"
                ],
                "Key": "domain-name-servers"
            }
        ],
        "DhcpOptionsId": "dopt-8bf1f9e9"
    }
}
$ aws ec2 associate-dhcp-options --vpc-id vpc-aa4958c8 --dhcp-options-id dopt-8bf1f9e9 --region ap-northeast-1
{
    "return": "true"
}
Internet Gatewayを作成し、VPCに割り当てます
$ aws ec2 create-internet-gateway --region ap-northeast-1
{
    "InternetGateway": {
        "Tags": [],
        "InternetGatewayId": "igw-d6796cb4",
        "Attachments": []
    }
}

$ aws ec2 attach-internet-gateway --vpc-id vpc-aa4958c8 --internet-gateway-id igw-d6796cb4 --region ap-northeast-1
{
    "return": "true"
}
Route Tableを作成し、VPCに割り当て、Internet Gatewayにルーティングをします。
$ aws ec2 create-route-table --vpc-id vpc-aa4958c8 --region ap-northeast-1
{
    "RouteTable": {
        "Associations": [],
        "RouteTableId": "rtb-545b4b36",
        "VpcId": "vpc-aa4958c8",
        "PropagatingVgws": [],
        "Tags": [],
        "Routes": [
            {
                "GatewayId": "local",
                "DestinationCidrBlock": "10.0.0.0/16",
                "State": "active"
            }
        ]
    }
}

$ aws ec2 associate-route-table --subnet-id subnet-e71f1685 --route-table-id rtb-545b4b36 --region ap-northeast-1
{
    "AssociationId": "rtbassoc-950010f7"
}

$ aws ec2 create-route --route-table-id rtb-545b4b36 --destination-cidr-block 0.0.0.0/0 --gateway-id igw-d6796cb4 --region ap-northeast-1
{
    "return": "true"
}
Security Groupに作成し、ルールを追加します
$ aws ec2 create-security-group --group-name okochang-group --description "test security group"  --vpc-id vpc-aa4958c8 --region ap-northeast-1
{
    "return": "true",
    "GroupId": "sg-654c5007"
}

$ aws ec2 authorize-security-group-ingress --group-id sg-654c5007 --cidr 0.0.0.0/0 --protocol tcp --port 22 --region ap-northeast-1
{
    "return": "true"
}接続用のSSHキーを作成します
$ aws ec2 create-key-pair --key-name okochang-key --region ap-northeast-1
{
    "KeyMaterial": "-----BEGIN RSA PRIVATE KEY-----\nMIIEpAIqr00==中略==JRGHg2o6kls0w==\n-----END RSA PRIVATE KEY-----",
    "KeyName": "okochang-key",
    "KeyFingerprint": "11:aa:22:bb:33:cc:44:dd:55:ee:66:ff:77:gg:88:hh:99:ii:10:jj"
}動作確認用のインスタンスを起動します
$ aws ec2 run-instances \
--image-id ami-0d13700c \
--key-name okochang-key \
--security-group-ids sg-654c5007 \
--instance-type t1.micro \
--subnet-id subnet-e71f1685 \
--disable-api-termination \
--instance-initiated-shutdown-behavior stop \
--private-ip-address 10.0.0.10 \
--associate-public-ip-address --region ap-northeast-1
{
    "OwnerId": "12345678910",
    "ReservationId": "r-f48d4cf1",
    "Groups": [],
    "Instances": [
        {
            "Monitoring": {
                "State": "disabled"
            },
            "PublicDnsName": null,
            "KernelId": "aki-176bf516",
            "State": {
                "Code": 0,
                "Name": "pending"
            },
            "EbsOptimized": false,
            "LaunchTime": "2014-01-25T12:58:08.000Z",
            "PrivateIpAddress": "10.0.0.10",
            "ProductCodes": [],
            "VpcId": "vpc-aa4958c8",
            "StateTransitionReason": null,
            "InstanceId": "i-eaae01ef",
            "ImageId": "ami-0d13700c",
            "PrivateDnsName": "ip-10-0-0-10.ap-northeast-1.compute.internal",
            "KeyName": "okochang-key",
            "SecurityGroups": [
                {
                    "GroupName": "okochang-group",
                    "GroupId": "sg-654c5007"
                }
            ],
            "ClientToken": null,
            "SubnetId": "subnet-e71f1685",
            "InstanceType": "t1.micro",
            "NetworkInterfaces": [
                {
                    "Status": "in-use",
                    "SourceDestCheck": true,
                    "VpcId": "vpc-aa4958c8",
                    "Description": null,
                    "NetworkInterfaceId": "eni-e9beaa8b",
                    "PrivateIpAddresses": [
                        {
                            "PrivateDnsName": "ip-10-0-0-10.ap-northeast-1.compute.internal",
                            "Primary": true,
                            "PrivateIpAddress": "10.0.0.10"
                        }
                    ],
                    "PrivateDnsName": "ip-10-0-0-10.ap-northeast-1.compute.internal",
                    "Attachment": {
                        "Status": "attaching",
                        "DeviceIndex": 0,
                        "DeleteOnTermination": true,
                        "AttachmentId": "eni-attach-41085c44",
                        "AttachTime": "2014-01-25T12:58:08.000Z"
                    },
                    "Groups": [
                        {
                            "GroupName": "okochang-group",
                            "GroupId": "sg-654c5007"
                        }
                    ],
                    "SubnetId": "subnet-e71f1685",
                    "OwnerId": "12345678910",
                    "PrivateIpAddress": "10.0.0.10"
                }
            ],
            "SourceDestCheck": true,
            "Placement": {
                "Tenancy": "default",
                "GroupName": null,
                "AvailabilityZone": "ap-northeast-1a"
            },
            "Hypervisor": "xen",
            "BlockDeviceMappings": [],
            "Architecture": "x86_64",
            "StateReason": {
                "Message": "pending",
                "Code": "pending"
            },
            "RootDeviceName": "/dev/sda1",
            "VirtualizationType": "paravirtual",
            "RootDeviceType": "ebs",
            "AmiLaunchIndex": 0
        }
    ]
}
動作確認
resolv.confやntp.confを見るとDHCP Option Setで指定した値が/sbin/dhclient-scriptスクリプトによって設定されたことが分かります。
$ cat /etc/resolv.conf
; generated by /sbin/dhclient-script
search okochang.com
nameserver 8.8.4.4
nameserver 8.8.8.8

$ tail -3 /etc/ntp.conf
interface listen eth0
interface ignore ipv6
server 210.173.160.27   # added by /sbin/dhclient-script
awscliを使ってIAMユーザーを作成・削除する
AWSのIAMアカウントを複数作るときにManagement Consoleで作業をすると時間もかかってしまいますし、ミスも多くなります。
そういうときはコマンドラインツールを使ったりSDKを使った方が楽が出来るので、IAMユーザーの作成手順を残しておきます。
作成手順
ユーザーを作成する
$ aws iam create-user --user-name foo
{
    "User": {
        "UserName": "foo",
        "Path": "/",
        "CreateDate": "2014-01-22T15:37:34.673Z",
        "UserId": "AIDAJDSTS6NKEGLHA53L4",
        "Arn": "arn:aws:iam::12345678910:user/foo"
    }
}
IAMユーザーにパスワードを作成
$ aws iam create-login-profile --user-name foo --password foo-password
{
    "LoginProfile": {
        "UserName": "foo",
        "CreateDate": "2014-01-22T15:40:44.953Z"
    }
}
アクセスキーとシークレットキーを作成
$ aws iam create-access-key --user-name foo
{
    "AccessKey": {
        "UserName": "foo",
        "Status": "Active",
        "CreateDate": "2014-01-22T15:43:33.530Z",
        "SecretAccessKey": "*******************************",
        "AccessKeyId": "AKIAJWBY7Z4AUQQEOHPA"
    }
}
グループを作成
$ aws iam create-group --group-name foo-group
{
    "Group": {
        "Path": "/",
        "CreateDate": "2014-01-22T15:44:57.967Z",
        "GroupId": "AGPAIFQSBSRZLEC4Q3JVK",
        "Arn": "arn:aws:iam::12345678910:group/foo-group",
        "GroupName": "foo-group"
    }
}
グループにポリシーを割り当てる
$ aws iam put-group-policy --group-name foo-group --policy-document file://./user_foo_policy.json --policy-name foo-policy
グループにユーザーを割り当てる
$ aws iam add-user-to-group --user-name foo --group-name foo-group
削除
グループからユーザーを外す
$ aws iam remove-user-from-group --user-name foo --group-name foo-group
グループポリシーの削除
$ aws iam delete-group-policy --group-name foo-group --policy-name foo-policy
グループの削除
$ aws iam delete-group --group-name foo-group
アクセスキーとシークレットキーの削除
$ aws iam delete-access-key --user-name foo --access-key AKIAJWBY7Z4AUQQEOHPA
ログインパスワードの削除
$ aws iam delete-login-profile --user-name foo
ユーザーの削除
$ aws iam delete-user --user-name foo
