FluetndでApacheのアクセスログを集約する
こんにちは@oko_changです。
すでに色々な方がまとめていますが、やっぱり自分なりにブログにまとめたほうが覚えやすいので今回はfluentdについて書きます。
Fluentdとは?
こちらを見るのがやはり早いですかね。
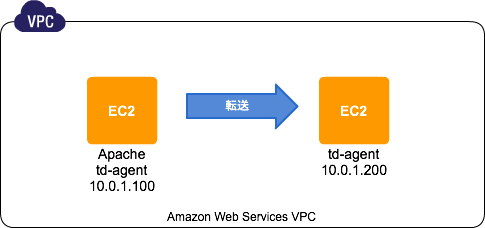
環境
どちらもCentOS 6.5を使用しています。
今回はFluentdを使ってローカルのファイルに保存しつつ、転送先にも保存するまで確認します。

転送元環境
インストール前
Fluentdについては色々な方がブログとかでもまとめているので、そちらを参考になりますが、公式ドキュメントもとても充実していました。
ここにFluentdをインストール前にするべき事が記載されていますので、設定します。
※limits.confとsysctl.confにそれぞれ追記する
# vi /etc/security/limits.conf
root soft nofile 65536
root hard nofile 65536
* soft nofile 65536
* hard nofile 65536

# vi /etc/sysctl.conf
net.ipv4.tcp_tw_recycle = 1
net.ipv4.tcp_tw_reuse = 1
net.ipv4.ip_local_port_range = 10240    65535

# reboot
Apacheの設定
今回はテスト用のログファイルとしてApacheのアクセスログを使用します。
テスト環境のアクセスログのフォーマットは以下のように変更してあります。
また、td-agent(Fluentd安定版の配布パッケージ )にアクセス出来るようにログディレクトリの権限を修正します。
# grep "custom" /etc/httpd/conf/httpd.conf
LogFormat "%{%Y-%m-%d %T %Z}t %D %a %u [%r] %s %b [%{Referer}i] [%{User-Agent}i]" custom
CustomLog logs/access_log custom
# chmod 755 /var/log/httpd
td-agentのインストール、設定
次にtd-agentをインストールします。
公式ドキュメントに記載してあるようにインストールスクリプトを使って簡単に導入が可能です。
# curl -L http://toolbelt.treasuredata.com/sh/install-redhat.sh | sh
設定方法も公式ドキュメントのconfig-file、input-plugin、output-pluginをひと通り読むと分かりやすかったです。
Apacheデフォルトのログ形式であればテンプレートがあるみたいですが、今回は少しカスタマイズしているため、正規表現のチェックをこちらでやりました。
また、自分のローカルと別のFluetndサーバに転送するため、以下のような設定をしています。
# vi /etc/td-agent/td-agent.conf
## Input
<source>
  type tail
  path /var/log/httpd/access_log
  format /^(?<date>\d{4}-\d{2}-\d{2} \d{2}:\d{2}:\d{2} \w{3}) (?<processing_time>[^ ]*) (?<remote>[^ ]*) (?<user>[^ ]*) \[(?<method>.*)\] (?<status>[^ ]*) (?<size>[^ ]*) \[(?<referer>[^ ]*)\] \[(?<agent>.*)\]/
  pos_file /var/log/td-agent/tmp/apache.access.log.pos
  tag apache.access
</source>

## Output
<match apache.access>
  type copy
  <store>
    type file
    path /var/log/td-agent/apache.access
    time_slice_format %Y%m%d
    time_format %Y%m%dT%H%M%S%z
  </store>
  <store>
    type forward
    send_timeout 60s
    recover_wait 10s
    heartbeat_interval 1s
    <server>
      name fluentd.okochang.com
      host 10.0.1.200
      port 24224
    </server>
  </store>
</match>上記で設定したディレクトリなどを作成して、自動起動の設定をしたらデーモンを起動します。
# mkdir /var/log/td-agent/tmp
# chown td-agent.td-agent /var/log/td-agent/tmp
# chkconfig td-agent on
# service td-agent start
転送先環境
転送元環境と同じようにインストール前の作業をしたら、td-agentを同じくインストールします。
td-agent.confは以下のように設定しました。
# curl -L http://toolbelt.treasuredata.com/sh/install-redhat.sh | sh
# vi /etc/td-agent/td-agent.conf
<source>
  type forward
  port 24224
  bind 0.0.0.0
</source>

<match apache.access>
  type file
  path /var/log/fluentd/all_access.log
  time_slice_format %Y%m%d
  time_format %Y%m%dT%H%M%S%z
</match>
さらに必要なディレクトリを作成し、自動起動の設定をしたら起動します。
# mkdir /var/log/fluentd
# chown td-agent.td-agent /var/log/fluentd/
# chkconfig td-agent on
# service td-agent start
動作確認
以下のようにログが出力されました。
転送元のログファイル
# tail -f /var/log/td-agent/apache.access.20140317.b4f4bb855c8fbaa5a
20140317T094432+0900	apache.access	{"date":"2014-03-17 09:44:32 JST","processing_time":"372","remote":"202.215.74.59","user":"-","method":"GET / HTTP/1.1","status":"304","size":"-","referer":"-","agent":"Mozilla/5.0 (Macintosh; Intel Mac OS X 10.7; rv:27.0) Gecko/20100101 Firefox/27.0"}
転送先のログファイル
# tail -f /var/log/fluentd/all_access.log.20140317.b4f4bb675d4776d09
20140317T094432+0900	apache.access	{"date":"2014-03-17 09:44:32 JST","processing_time":"372","remote":"202.215.74.59","user":"-","method":"GET / HTTP/1.1","status":"304","size":"-","referer":"-","agent":"Mozilla/5.0 (Macintosh; Intel Mac OS X 10.7; rv:27.0) Gecko/20100101 Firefox/27.0"}
まとめ
fluetndは色々な方がブログにそれちらも参考になるけど、やっぱり公式のドキュメント読むとさらに理解が深まりますね。
参考リンク
- http://docs.fluentd.org/ja/articles/before-install
- http://docs.fluentd.org/ja/articles/install-by-rpm
- http://docs.fluentd.org/ja/articles/config-file
- http://docs.fluentd.org/ja/articles/input-plugin-overview
- http://docs.fluentd.org/ja/articles/output-plugin-overview
- http://fluentular.herokuapp.com/
- http://hivecolor.com/id/37
- http://knowledge.sakura.ad.jp/tech/1336/
- http://blog.excale.net/index.php/archives/1704
- http://blog.excale.net/index.php/archives/1997